
Smilecloud iPad Photography & Simulation Guide
This guide is designed for clinicians who plan to use only iPads to create Smile Designs and video simulations in Smilecloud.
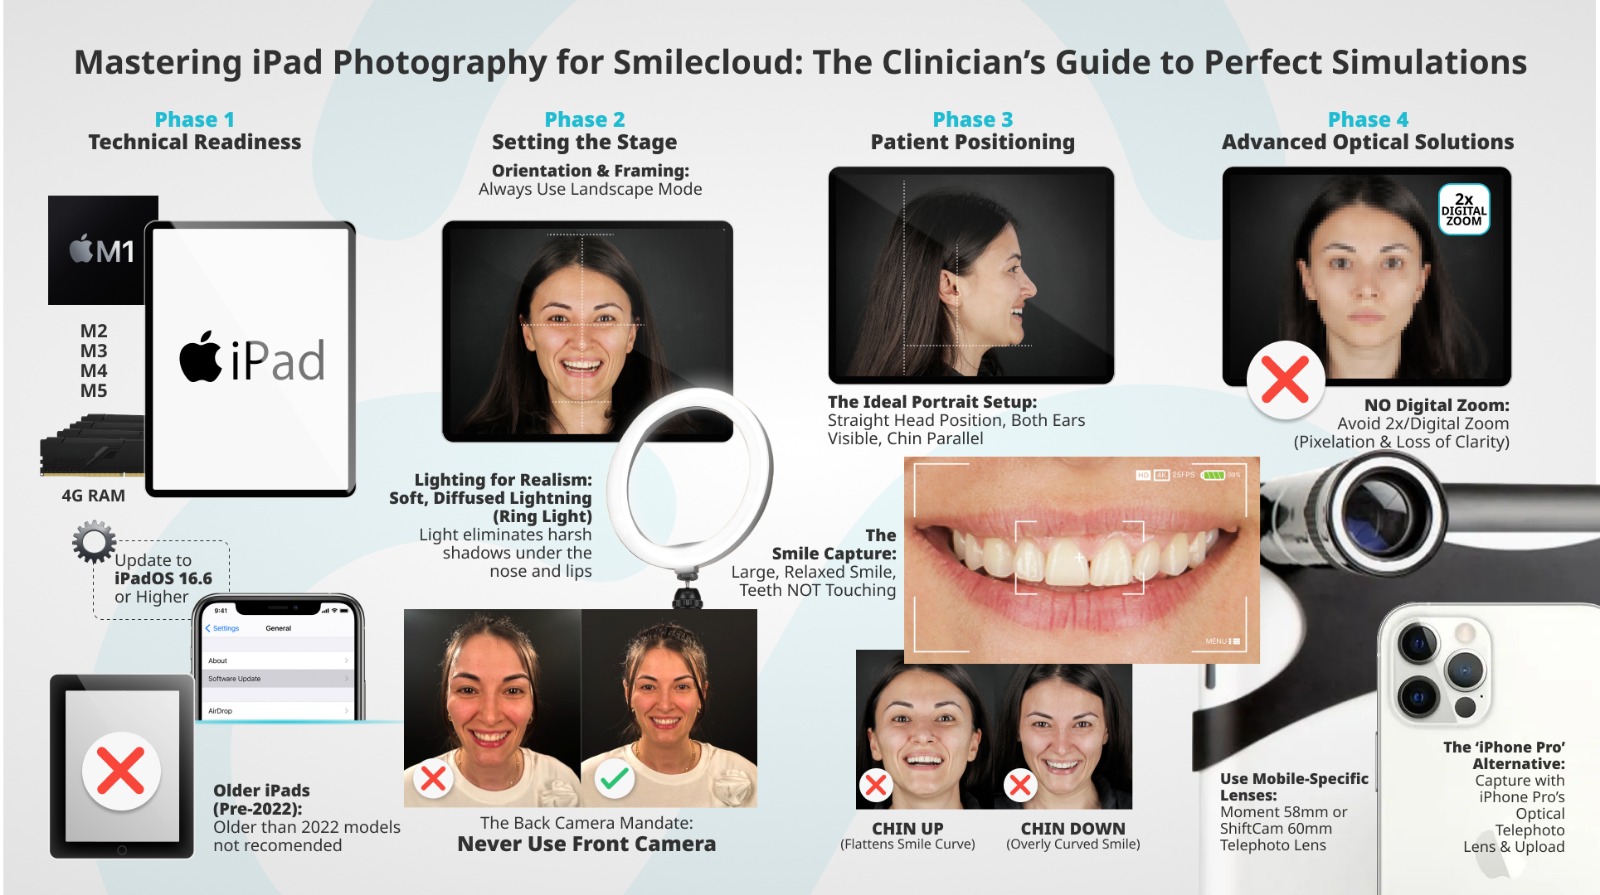
Technical Minimum Requirements
iPad Compatibility
The Smilecloud iPad app is optimized for most modern iPad models, but some conditions need to be met.
- M Processor is required iPad performance
- Make sure you have at least 4GB of available RAM when running Smiledesign on ipad
- Best performance is achieved with iPads that have M1 to M5 processors
- iPads without M processors - should not be older than 2022.
iPadOS version:
- Minimum required: iPadOS 16.6
- Recommended: Latest available iPadOS version
You can check and update your iPadOS version directly from Apple:
- Settings → General → Software Update
Smilecloud App version:
Make sure your Smilecloud app is up to date. Download the latest version here: App Store
You can also select the auto update in settings:
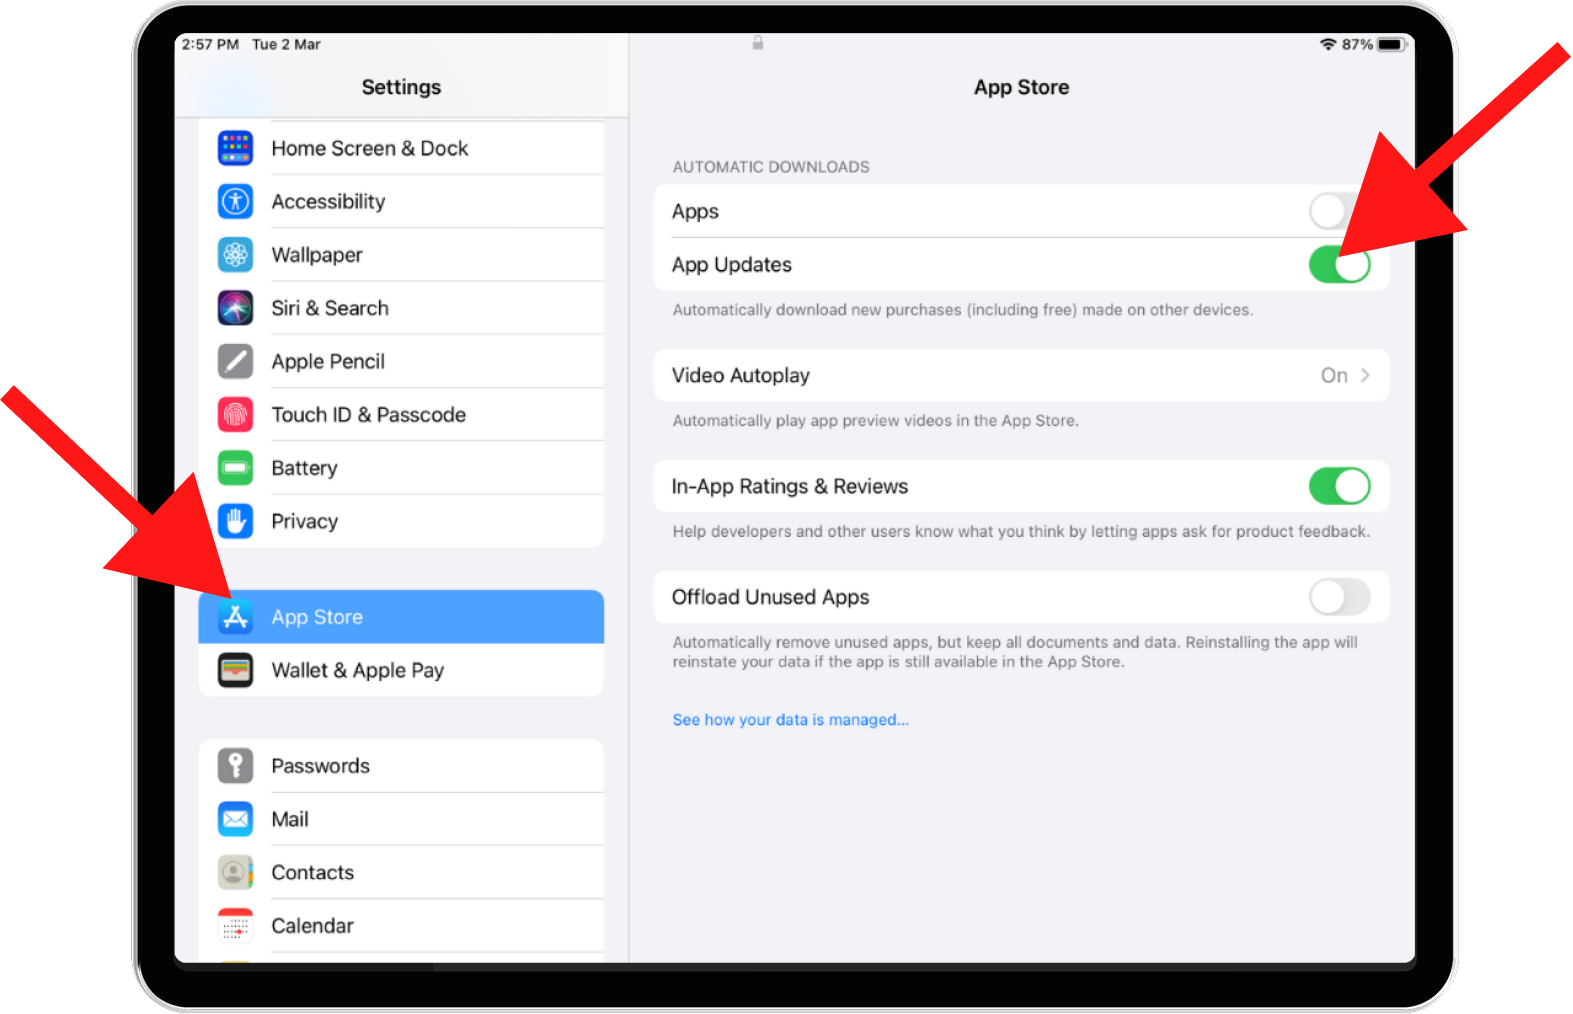
Photo Input: Why It Matters
Smilecloud simulations are highly dependent on image input quality. While the AI can generate simulations from lower-quality images, the accuracy of tooth proportions, smile curves, and facial harmony improves significantly with better photos, especially for video simulations shown to patients. Think of the photo as the “foundation” of the Smile Design.
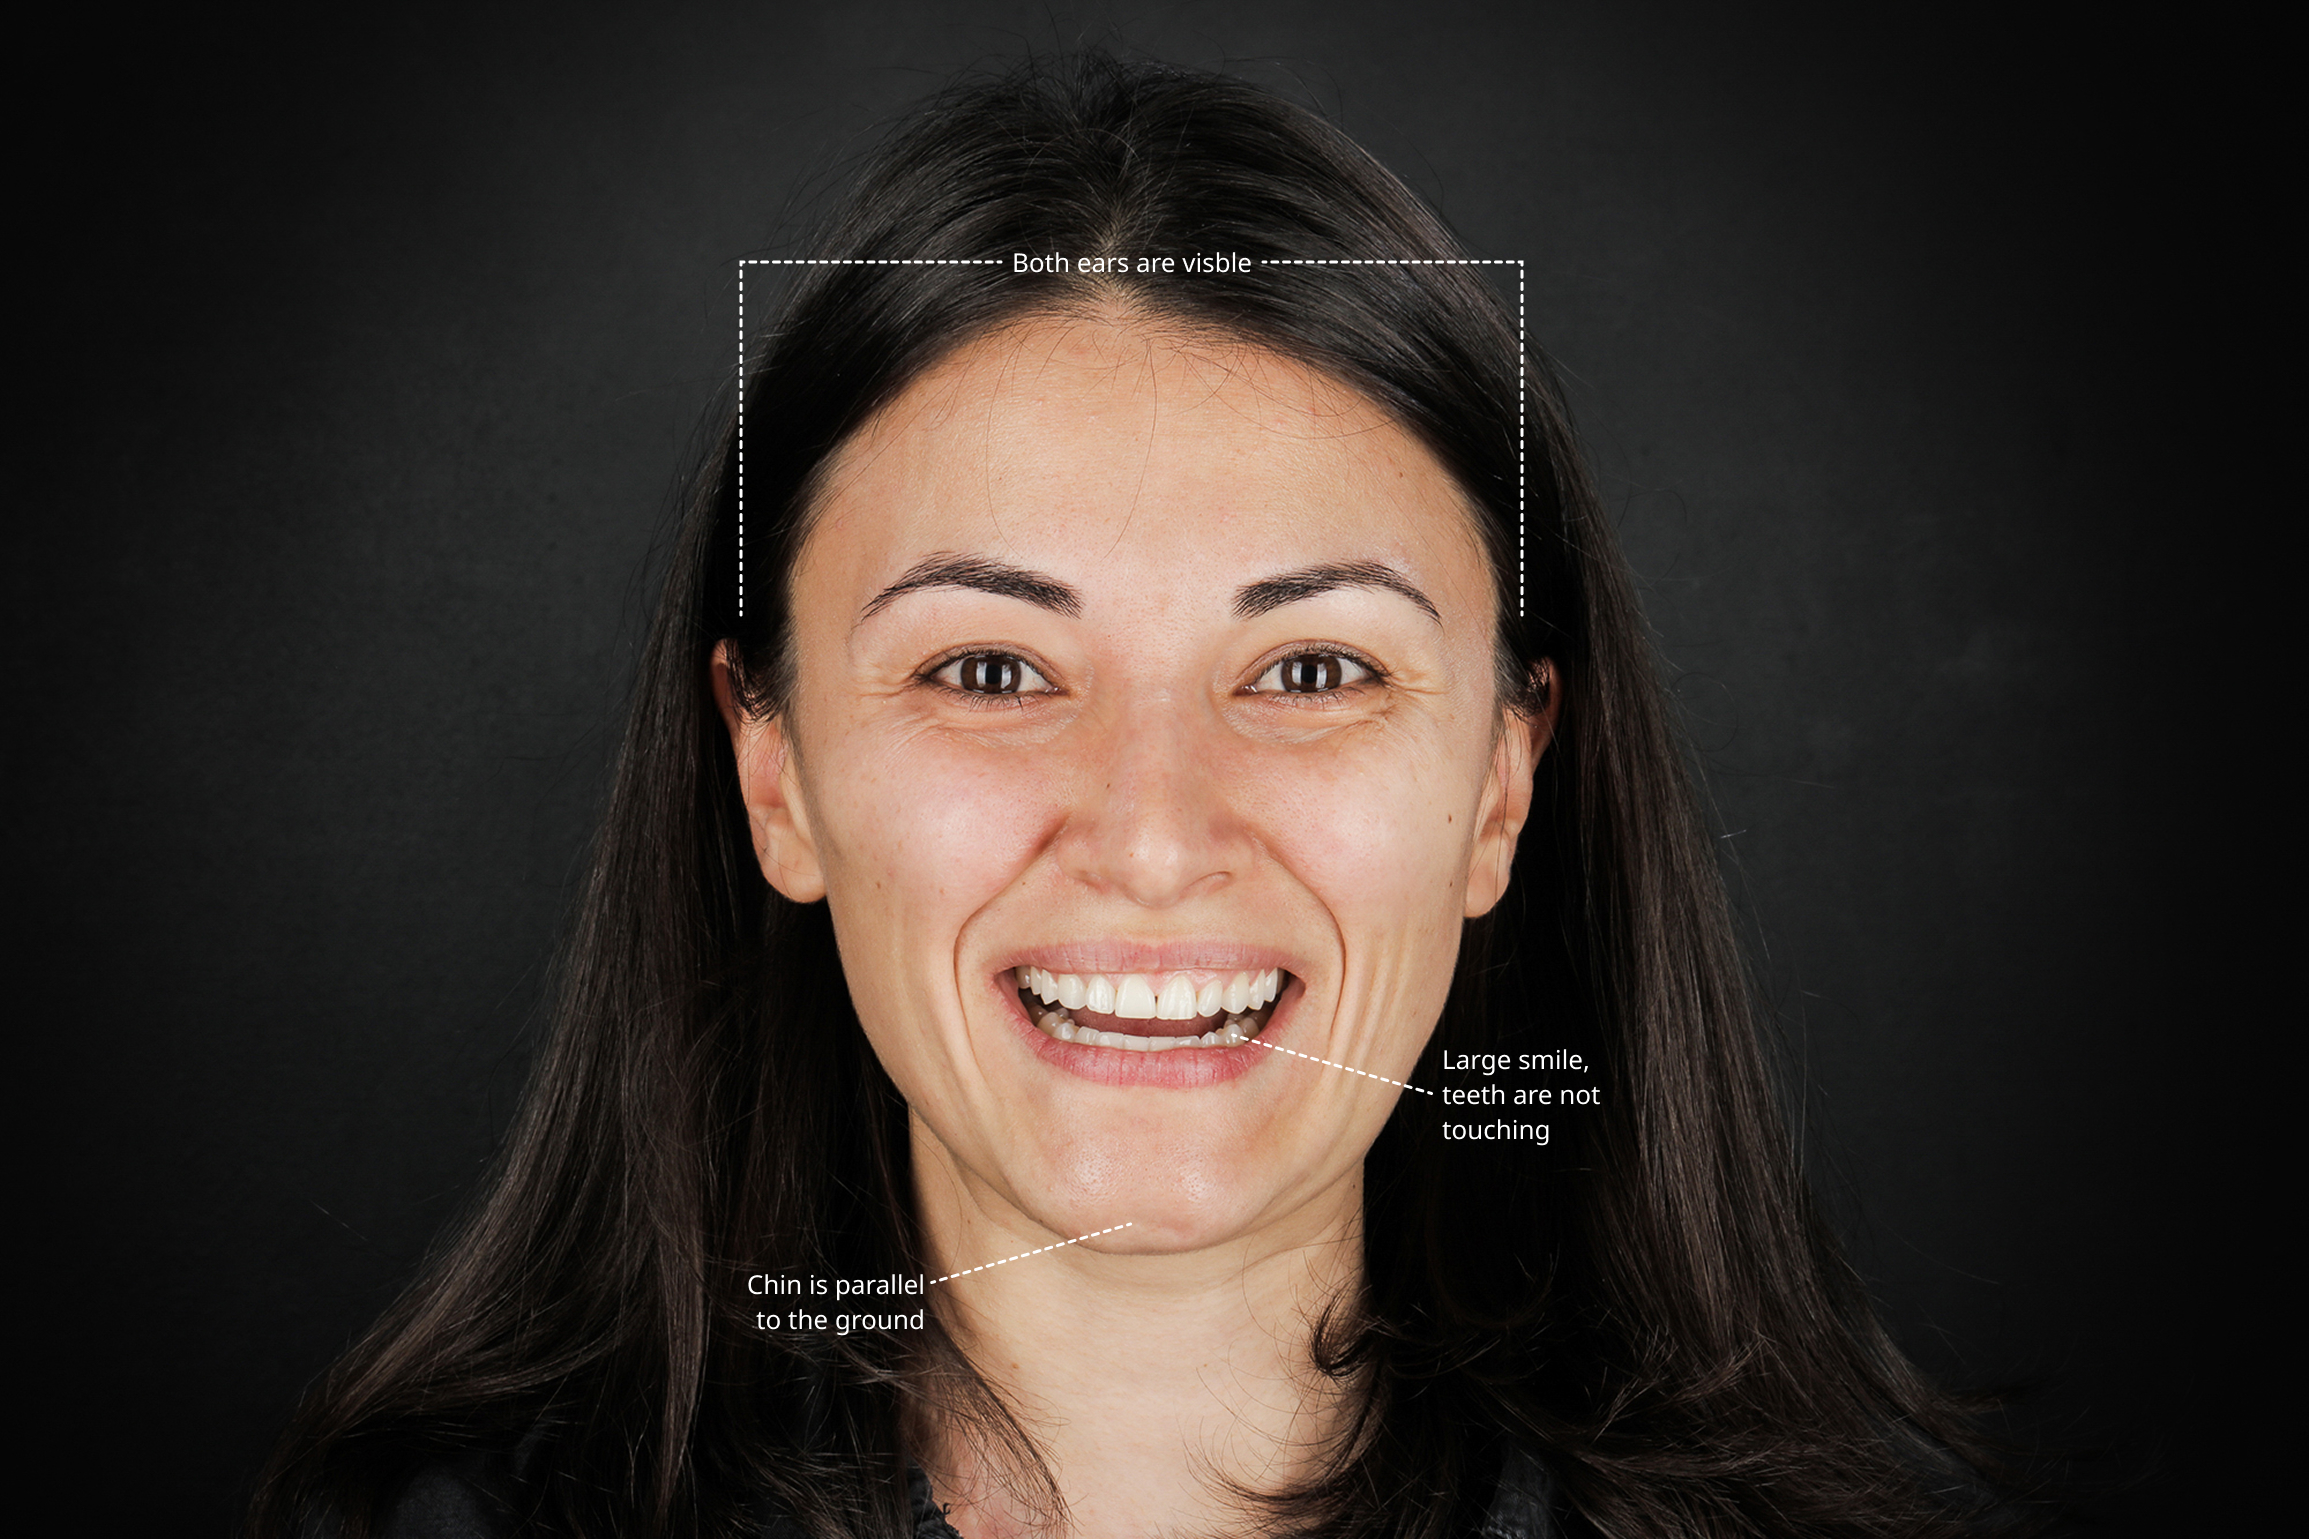
1. Patient Positioning
Correct head and facial positioning directly influence:
- Smile curve perception
- Tooth proportions
- Shape selection
- Overall realism of the simulation
Ideal Portrait Setup: For best results, ensure the following:
- Straight head position
- Both ears visible
- No head tilt left or right
- Chin parallel to the ground
- Large, relaxed smile
- Upper and lower teeth not touching
- Visible gingival zeniths (when possible)
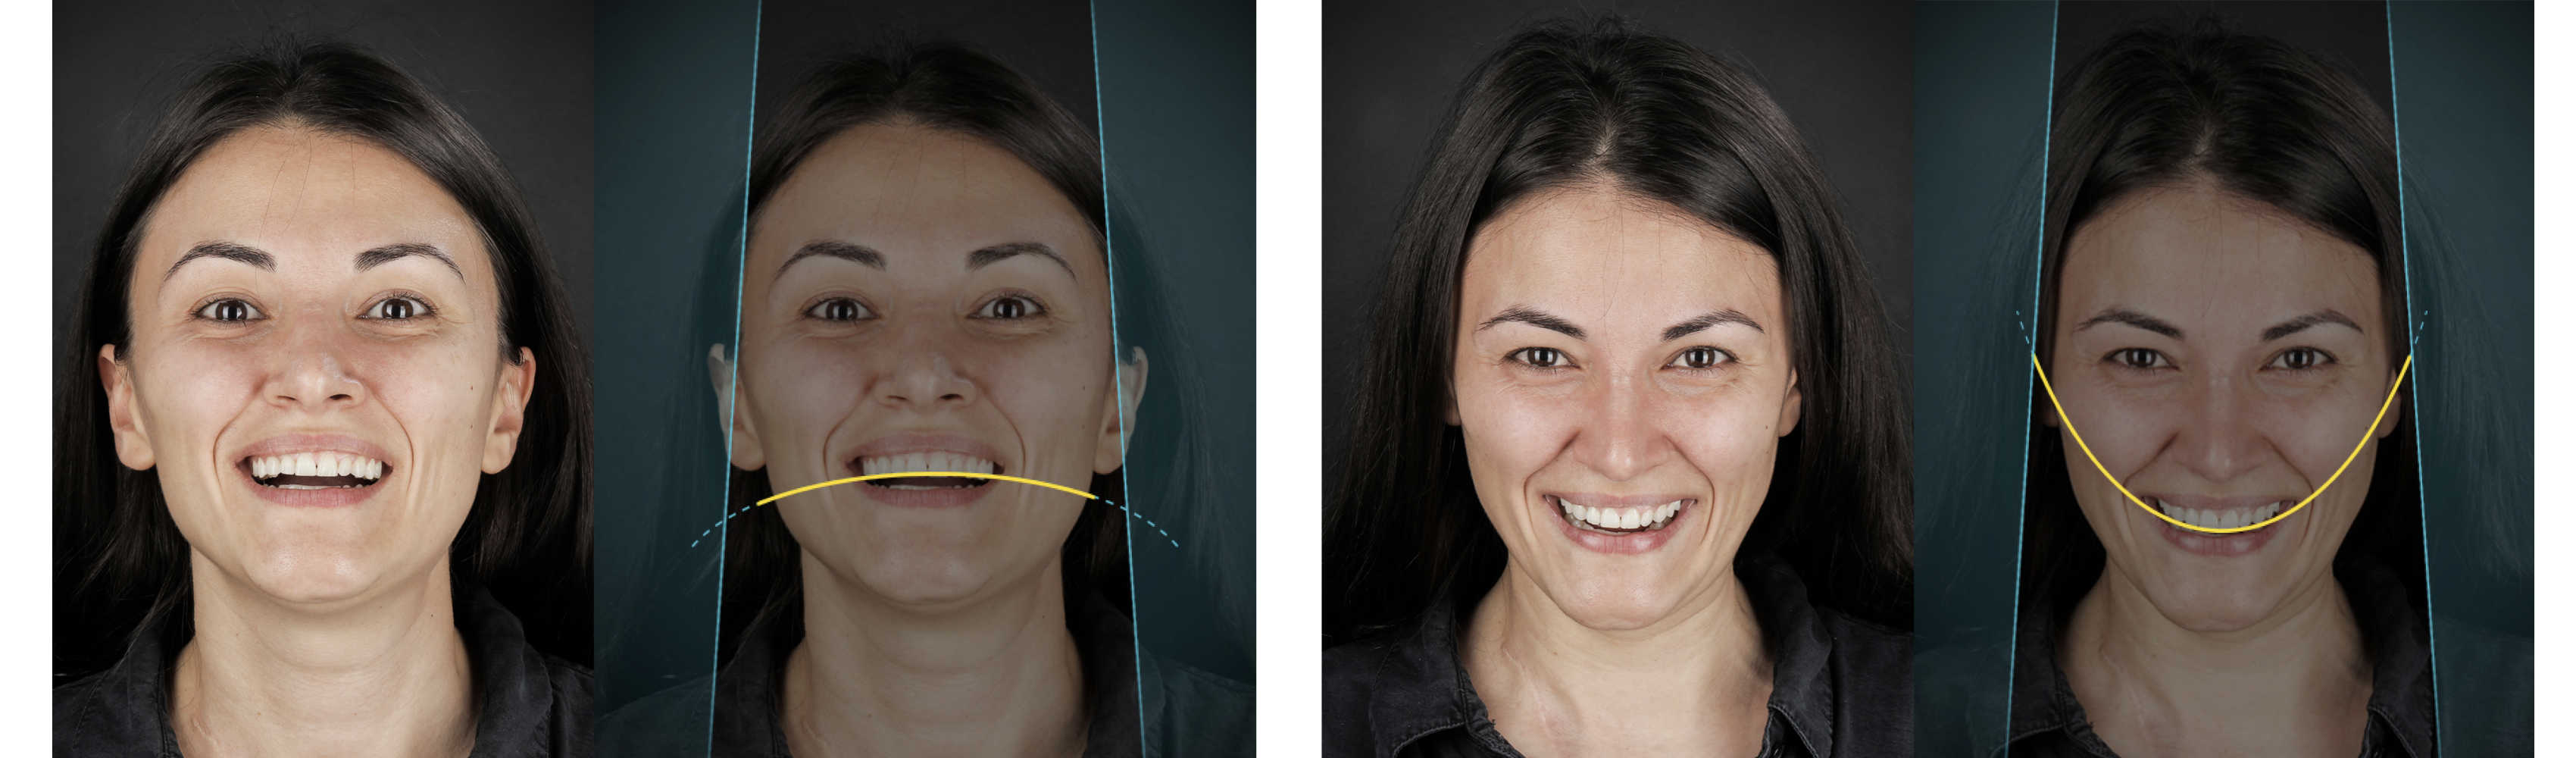
Avoid:
- Chin up → smile appears flatter
- Chin down → smile appears overly curved
These distortions affect tooth shape selection and gingival perception.
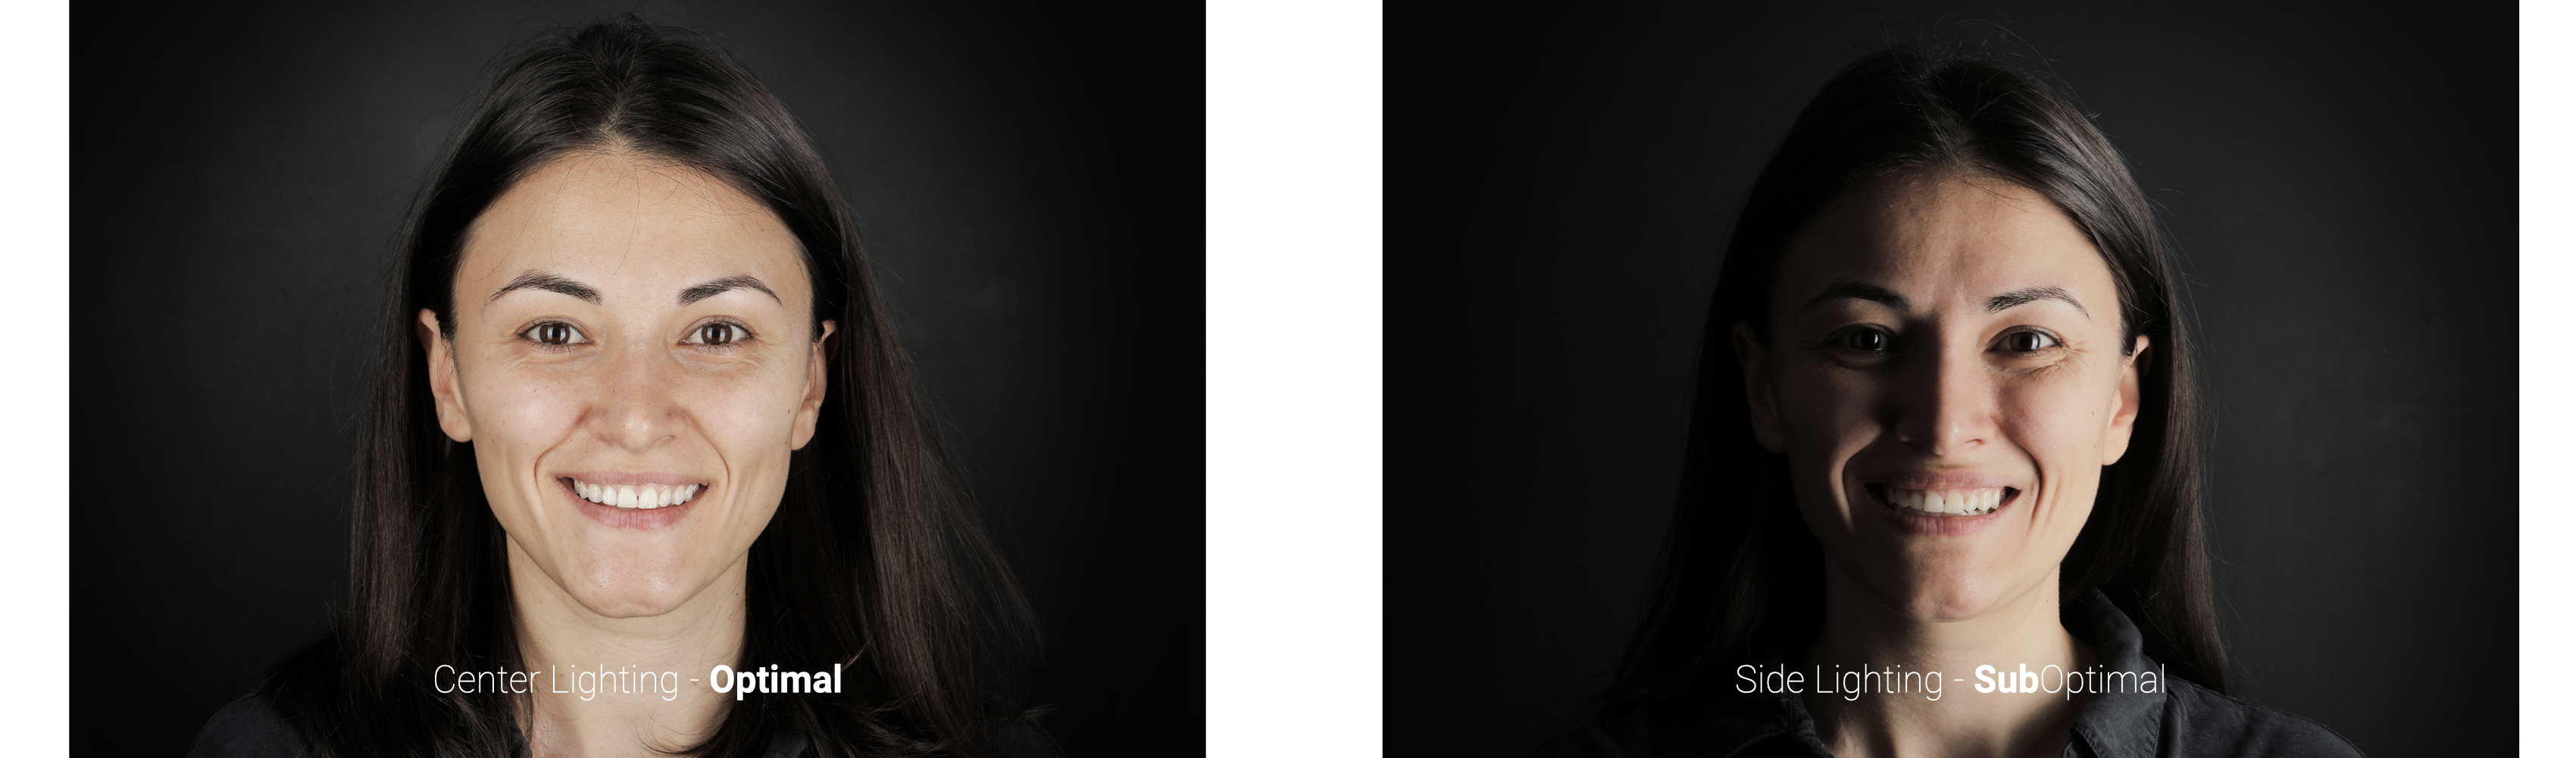
2. Lighting: Simple but Essential
Good lighting dramatically improves:
- Lip contours
- Skin tone accuracy
- Final simulation realism
Best Practices
- Use centered lighting or from both sides, not from one side
- Avoid overhead-only lighting that creates shadows under the nose and lips
Recommended Tools
- Ring light positioned directly in front of the patient or 2 Soft, diffused light (avoid harsh spotlights)
Even basic lighting setups outperform ambient clinic lighting alone.
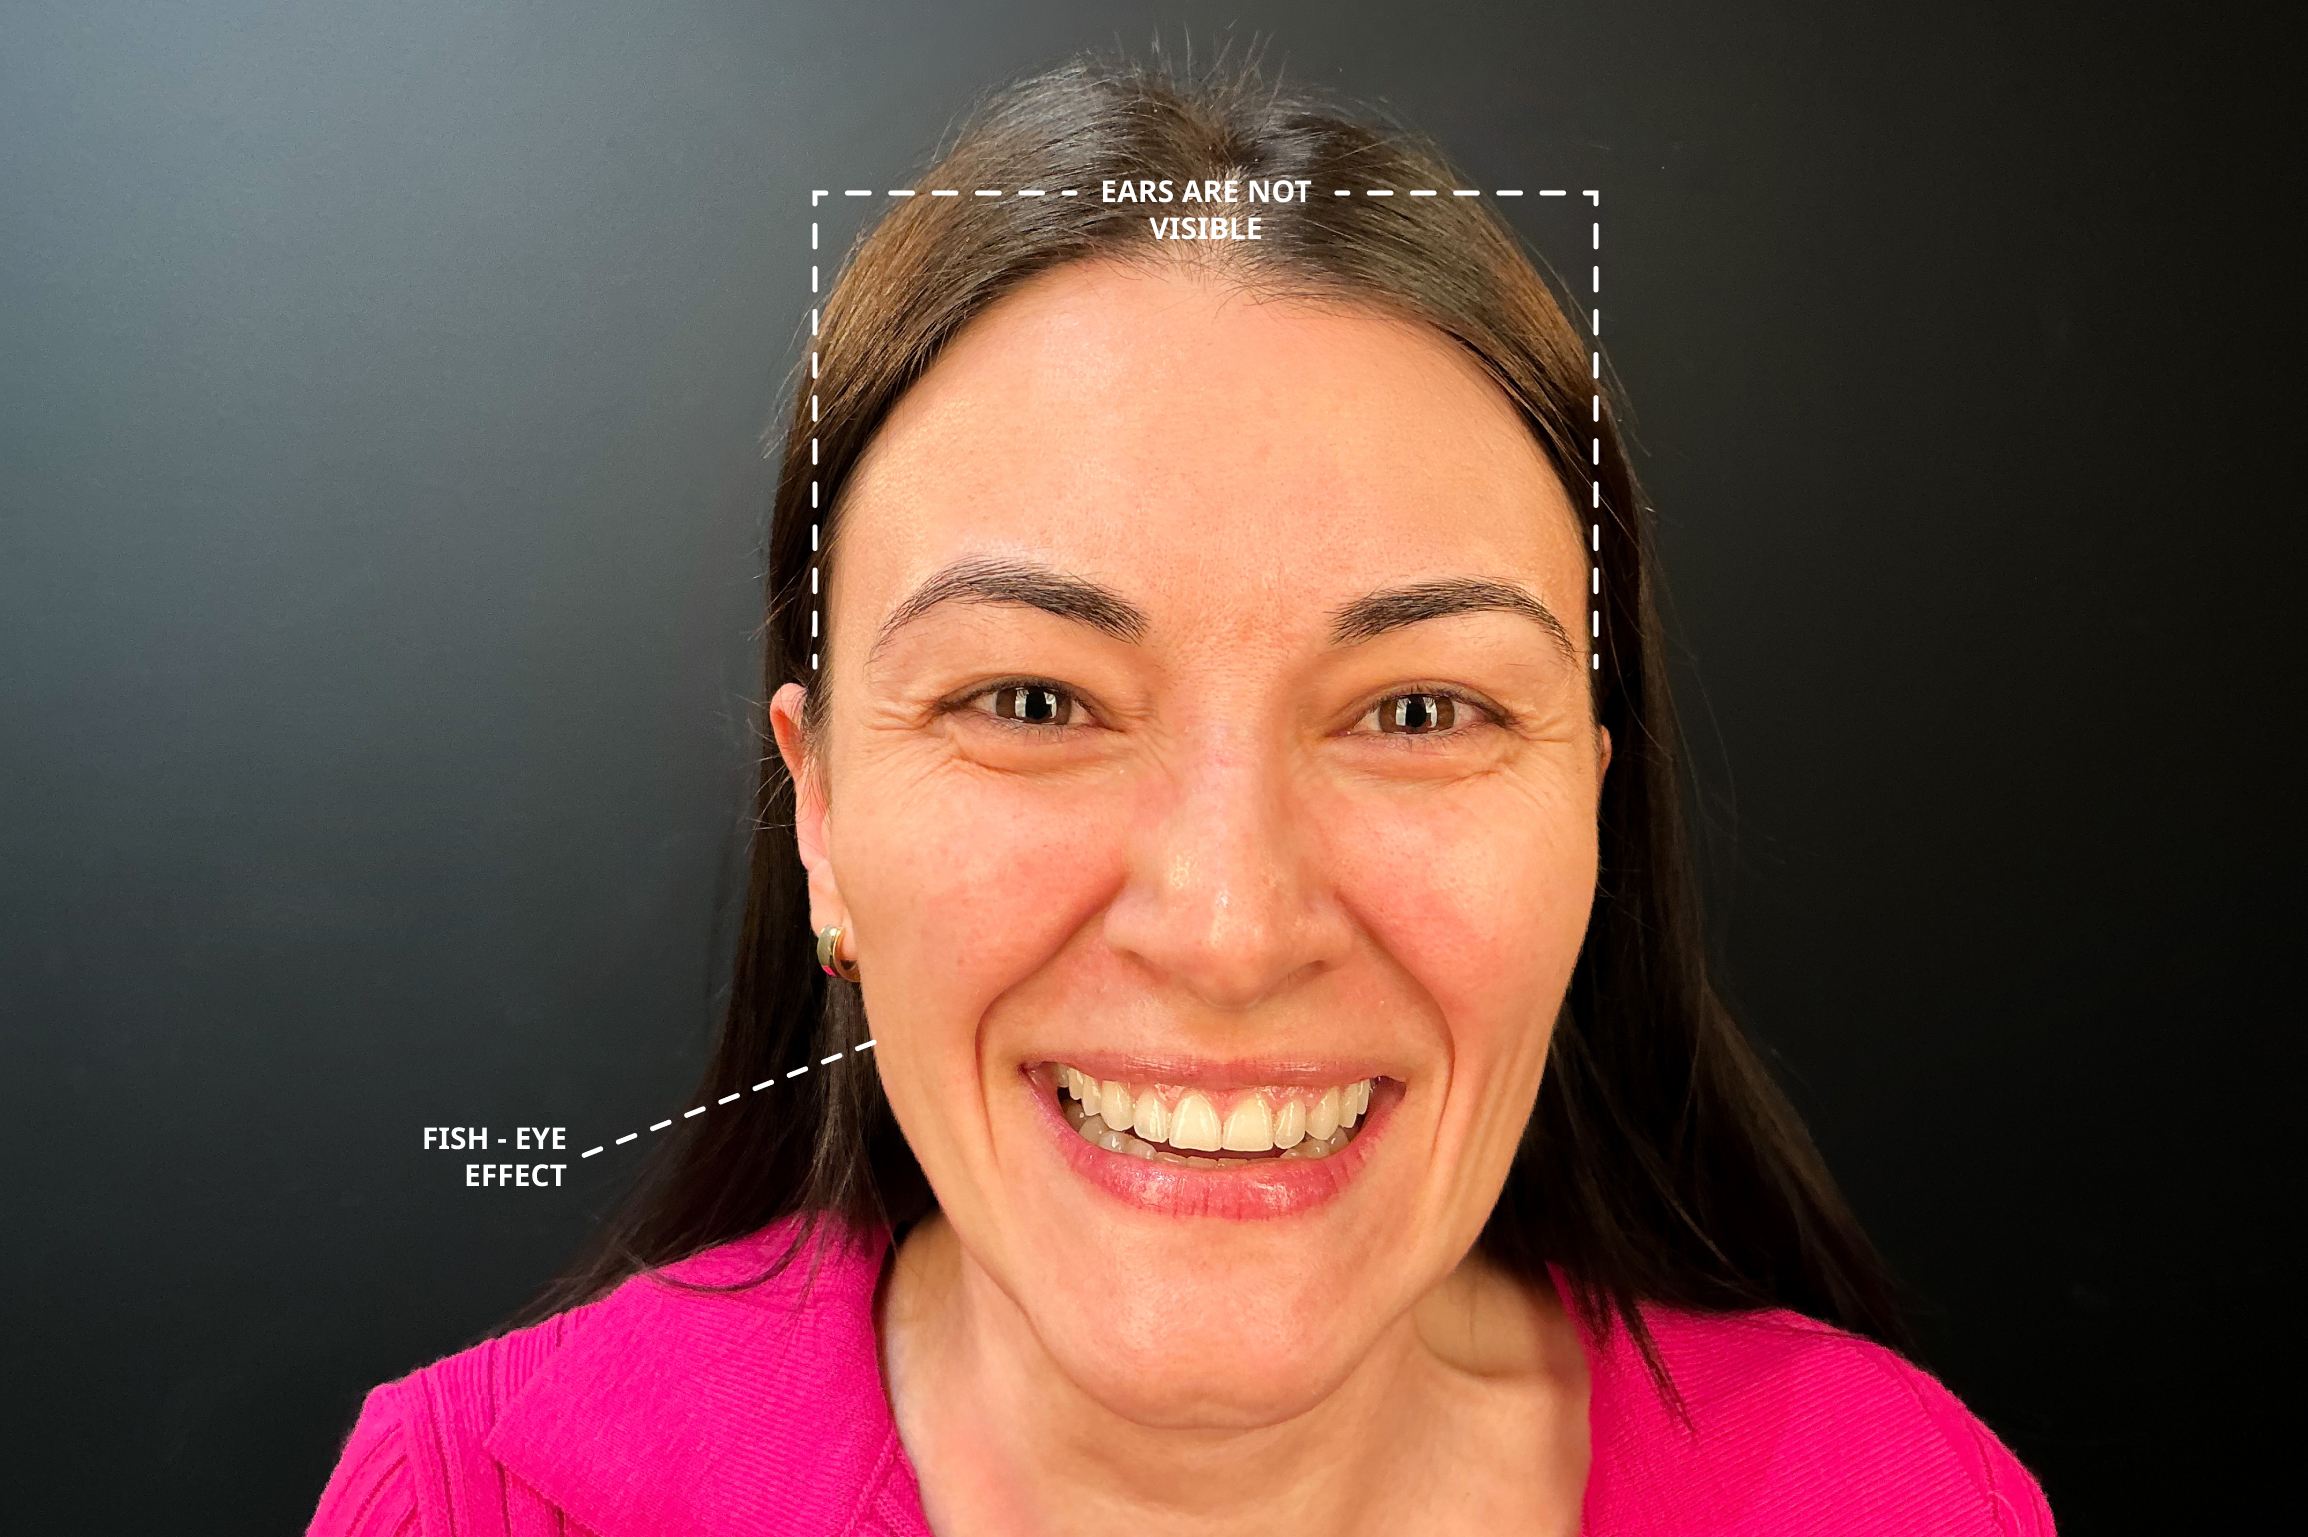
3. Camera Usage on iPad
Always Use the Back Camera
- Do not use the front (selfie) camera
Why?
- Front cameras have:
- Shorter focal length
- Lower depth accuracy
- “Fish-eye” distortion
(large nose, narrow face, ears disappearing)
This distortion negatively affects:
- Smile Design proportions
- Facial reference lines
- Video simulation realism
4. Framing & Orientation
Orientation
- Use landscape mode (horizontal)
Framing Guidelines
- Leave space:
- Above the head
- Below the chin
- Face centered in the frame
This helps Smilecloud detect the face correctly in 3D space
5. Distance & Zoom: What to Avoid
Avoid Digital or 2× Zoom on iPad
- iPad cameras are typically:
- Wide-angle only
- ~12 MP
- Using 2× zoom:
- Crops the image digitally
- Reduces sharpness
- Often results in pixelation
This negatively impacts:
- Tooth edge clarity
- Lip borders
- Final simulation quality
6. Alternatives for Proper Portrait Distance
A clinical setup requires distance from the patient, please use optical solutions, not digital zoom.
Option A: Attachable Mobile Lenses (Recommended for iPad)
Standard DSLR teleconverters do not work with iPads.
You must use mobile-specific lenses that align precisely with the iPad camera.
Recommended Lenses
Moment – 58mm Tele Lens
- 2× optical portrait compression
- Sharp details and natural proportions
- Requires a Moment case specific to your iPad model
Product example:
https://www.shopmoment.com/products/58mm-tele-lens
ShiftCam – 60mm Telephoto Lens
- Optical zoom (no pixelation)
- Excellent facial compression for portraits
- Works with:
- ShiftCam proprietary case or
- Universal adapter
Product example:
https://www.shiftcam.com/products/lensultra-60mm-telephoto-lens
Mounting System Is Key
- Clip-on or case-based systems are mandatory
- Lens must align perfectly with the iPad camera
- Poor alignment = blur, vignetting, or distortion
7. Best Optical Quality
If available, the best overall solution is:
- Capture and upload portraits with an iPhone Pro
- Use:
- 2× or 3× optical telephoto camera
- Then create the smile design simulation on the iPad
Why this works better:
- iPhone Pro telephoto lenses are designed for portraits
- Better compression
- More natural facial proportions
- Higher consistency for video simulations
8. Key Takeaways
- Update iPadOS regularly (minimum 16.6)
- Use the back camera
- Correct head position for better visibility of the teeth and gingiva
- Lighting - centered and soft
- Never rely on digital zoom on iPad
- Use mobile telephoto lenses or iPhone Pro when possible
- Better photos = better Smile Designs + more convincing simulations